Tuesday, November 15, 2011
Posted my $14 Rack Focus Device on YouTube
Saturday, November 5, 2011
Dolly Slider for DSLR video
I will be posting more complete instructions here. In the meantime, catch my video on YouTube via the link above.
Saturday, March 14, 2009
DIY Studio Camera Stand
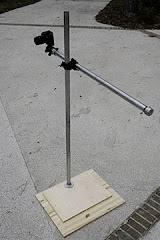
My initial design envisioned two large diameter pipes intersecting at 90 degrees, with the vertical shaft controlling height and the camera attached to the horizontal shaft. Connecting two pipes in this fashion required something I didn't know existed, but is common in the theatrical lighting and scaffolding industries--something called a "Cheeseborough Clamp".
Such clamps come in various sizes, "weights" and articulation ability. Some cheeseborough's swivel, some are locked at 45 degrees, and some are locked at 90 degrees. I finally found the perfect clamp, strong and heavy and locked at 90 degrees. This clamp is the secret to making this project feasible, and is the only hard-to-find item on the shopping list. It's also the most expensive part at $45.
- 10' 1 1/4" galvanized pipe
- 1 1/4" galvanized flange
- 1 1/4" galvanized cap
- 1 1/4" to 1" galvanized reducing coupler
- "Mega-Claw" Cheeseborough clamp locked at 90 degrees
- 3' x 6' plywood or hardboard
- Tripod head and shaft
- Epoxy putty
- Heavy wood screws
- Misc. screws and glue
Preparation
First, go to Home Depot or the like for the pipe, the flange, the cap, the screws and the glue. They don't carry the reducing coupler, but I found it at a large Ace Hardware in the plumbing section. Otherwise, it's a trip to the plumbing supply house or on-line. It costs about $1.50, but it's a key part.
Get the Mega-Claw from i.weiss.com in NY. I don't have a part number, so you should call them to make sure you get the right thing. Again, you want a 90 degree fixed clamp.
As a base for the stand, I wanted two thicknesses of 3/4" material. Two feet wide by three feet long should be about right. Here's how to put it all together.
Assembly
In the plumbing isle at Home Depot, have them cut the 10' pipe into two sections, one 6', the other 4' long. Keep just one end threaded on the 6' section, but thread both ends of the 4' section. Screw the cap on one end and the reducing coupler on the other end of the 4' pipe.
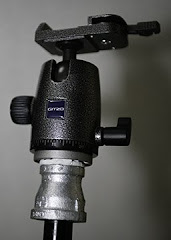
Now you will have to make a tough decision. I cannibalized an old heavy tripod by removing the center shaft and attached a very good ball head. I recommend getting a hold of a used heavy-duty tripod -- look for a used Bogen on Ebay if you don't have an extra tripod around. The shaft of the tripod is inserted into the coupler and secured with epoxy putty -- it's a permanent modification. At this point, you have the heaviest, most stable monopod in the universe. Great for shooting sports and birds, just don't take it on a hike. It weighs over 15 lbs.
For the base, cut 2 boards 2' by 3', then glue and screw the two together. It makes a solid, stable base. Screw the flange into the base, centered on the long edge, but close to the edge on the short side (see picture). The 6' section of pipe screws directly into the flange. Your base structure is now complete.
A few words on galvanized pipe. You really need to clean it thoroughly. Use a metal cleaner/polish, then apply a heavy coat of wax to both sections. Spend some time on these steps and it will pay big dividends in your use of the stand.
Next, attach your Mega-Claw to both sections of pipe, and you have a super studio stand that weighs about a hundred pounds, costs less than $100 and breaks down flat for transport. You could easily add casters to the base for added mobility and a computer tray on the cross arm for tethered shooting. It works great!


